Adjustable Storage Divider for the Classroom
Created by: Hannah Arnold and Angie Dalessio (EC-SEAT Scholars 2013-2015) during their internship year in Deerfield, NH
Note: EC-SEAT scholar interns provide two professional development workshops for cooperating teachers and interdisciplinary teams (including families and paraprofessionals) as part of their early childhood education: special needs option graduate programs at the University of New Hampshire. This adjustable storage folder was a low-tech Assistive Technology solution created by Hannah and Angie with paraprofessionals in their early childhood classrooms.
Student Reflection:
Hannah Arnold and I did a presentation at Deerfield Community School for paraprofessionals. This project was a collaborative effort with not only Hannah and myself, but it originally it started with Pat Rose, the Occupational Therapist and Bob Layton, who is part of the Technology department at Deerfield Community School. Included in this presentation you will find: Materials needed, and Pictures of the step by step directions to make the adjustable storage divider.
This was a beneficial low tech device that paraprofessionals could use to minimize distractions when students need to do independent or quiet work. In the beginning of the presentation they were not that excited about having to listen to Hannah and me, and then having to make something. However, by the end they were all thanking us and some let us know they were using the adjustable storage dividers in their classes with students. Hannah was also able to use the adjustable storage divider in the preschool classroom with one of her students. Students in the upper grades could definitely benefit from this device. The presentation taught me how important it is to have a clear message when presenting and to ensure that your instructions are explicit.
Materials Needed:
Directions:
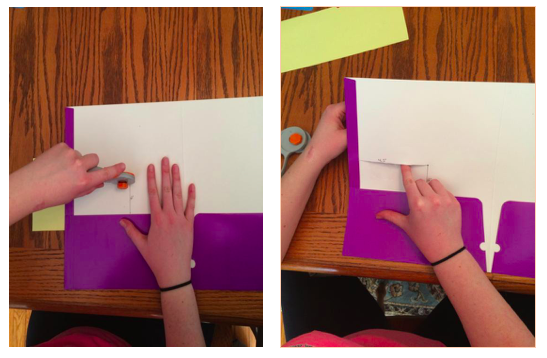
Draw a line 4.5 inches from the edge of the folder on the left side of the first folder. This line needs to be two inches above the folder pocket. Then, make a dot on the right side of the second folder with the same dimensions.

Use the utility knife to cut the 4.5 inch line. Make sure to leave ½ inch at the edge of the folder (do not cut all the way to the edge and use a mat under the folder when cutting). This is what it should look like the photo to the right below.
Add tape to reinforce the slit. Two pieces of packing tape per side. Make sure the packing tape is flat and tight. This will allow the folders to slide more easily. It should look the photo below on the right.

On the second folder on the right hand side. Make a hole with your utility knife or scissors 4.5 inches over and 2 inches above the folder pocket. The hole needs to be wide enough to fit a brad.

Insert the brad through the hole you just made. It should look like the photo to the right below.

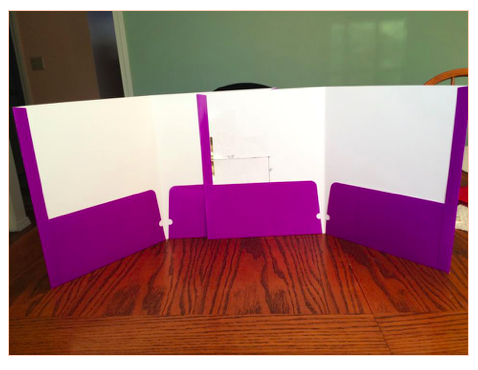
Layer the first folder over the brad (so the folders overlap) so that it looks like this.

The final product should look like the photo below.
Now, take your oak tag and lay it flat on the table. Stick half the tape on the paper and half off. Make sure the sticky side is facing the table. Fold edges of the oak tag backwards. So that the edge without tape rests on the sticky side of the other edge. After they are attached it should look like this.
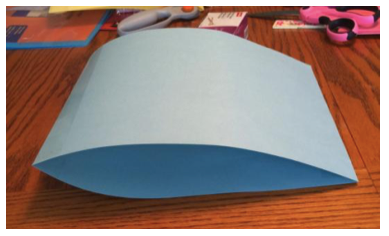
Add tape to the edge so that the surface (of the crease or edge) is not sticky. This is what it should look like.

Slide oak tag over folders so that the brad is covered.
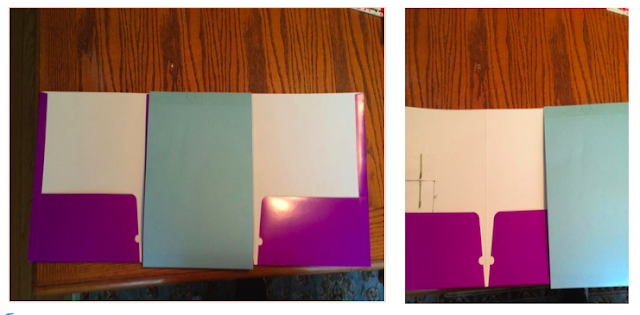
This is what it should look like!

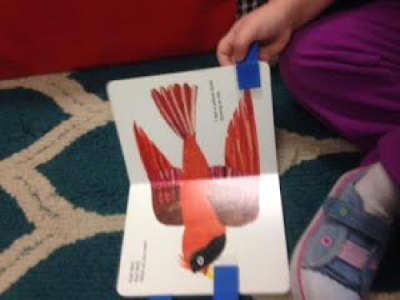
This low tech solution with everyday classroom items can be used with students of many ages. The student can carry it with them to help minimize distractions when doing their work, or it can be kept in the classroom for one, many, or all students to use when they need some privacy or supports to help their concentration.
This was a beneficial low tech device that paraprofessionals could use to minimize distractions when students need to do independent or quiet work. In the beginning of the presentation they were not that excited about having to listen to Hannah and me, and then having to make something. However, by the end they were all thanking us and some let us know they were using the adjustable storage dividers in their classes with students. Hannah was also able to use the adjustable storage divider in the preschool classroom with one of her students. Students in the upper grades could definitely benefit from this device. The presentation taught me how important it is to have a clear message when presenting and to ensure that your instructions are explicit.
Materials Needed:
- Two folders
- Oak Tag Paper
- Brads
- Scissors/utility knife
- Clear Packing Tape
- Ruler
Directions:
Draw a line 4.5 inches from the edge of the folder on the left side of the first folder. This line needs to be two inches above the folder pocket. Then, make a dot on the right side of the second folder with the same dimensions.

Use the utility knife to cut the 4.5 inch line. Make sure to leave ½ inch at the edge of the folder (do not cut all the way to the edge and use a mat under the folder when cutting). This is what it should look like the photo to the right below.

Add tape to reinforce the slit. Two pieces of packing tape per side. Make sure the packing tape is flat and tight. This will allow the folders to slide more easily. It should look the photo below on the right.

On the second folder on the right hand side. Make a hole with your utility knife or scissors 4.5 inches over and 2 inches above the folder pocket. The hole needs to be wide enough to fit a brad.

Insert the brad through the hole you just made. It should look like the photo to the right below.

Layer the first folder over the brad (so the folders overlap) so that it looks like this.

The final product should look like the photo below.

Now, take your oak tag and lay it flat on the table. Stick half the tape on the paper and half off. Make sure the sticky side is facing the table. Fold edges of the oak tag backwards. So that the edge without tape rests on the sticky side of the other edge. After they are attached it should look like this.

Add tape to the edge so that the surface (of the crease or edge) is not sticky. This is what it should look like.

Slide oak tag over folders so that the brad is covered.

This is what it should look like!

This low tech solution with everyday classroom items can be used with students of many ages. The student can carry it with them to help minimize distractions when doing their work, or it can be kept in the classroom for one, many, or all students to use when they need some privacy or supports to help their concentration.
Currently, Angie is an early childhood special educator for the Nashua, NH school district and Hannah providers early supports and services at Easters Seals NH in Salem.


Comments
Post a Comment
We invite you to share your thoughts and additional resources with our community of readers.
Also, contact us if you would like to be a guest blogger.